Showing posts with label sewing projects. Show all posts

Monday, 12 November 2012

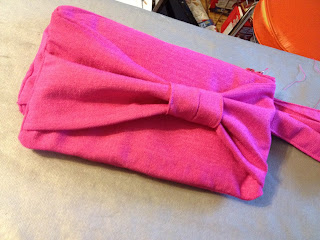
Wedding Mondays - DIY Bow Clutch

It's been a little puppy-overload here, and I haven't had a Wedding Monday in a long time, so here's an old post from my old wedding blog.

On Pinterest I found this great tutorial from Elm Street Life.
The clutch is super cute and super easy!

Anyways, I had this fabric that I bought with this in mind, because the fabric is the same colour (tone) as the boys ties. It's not identical, because I didn't have as many options as I wanted, but I had to buy like 2 metres for my sisters sash, so I made matching clutches! 

See, Moriah's sash, and the pocket square. Same shade pink, different type of fabric! 


It was so easy, only took me an afternoon and I made two of them! I used lots of interfacing because my fabric is a little flimsy, but it did the job! 

This is all the stuff I needed! I love my cutting board, one of the best things I've purchased for my sewing product. 

And this was the final product!!! 

Finished Product!
The process.... 


Thursday, 8 November 2012

DIY Dog Car Seat Cover

We might have small puppies, but these puppies have super dirty little paws. Especially when we go to the dog park (whats up with the dirt at the dog park, it's either WAY WAY dusty or WAY WAY muddy). Anyways, Eric hated putting them on the seats, and I hate when he puts them in the foot wells, so because Pinterest is my lover, I figured I could make my own.

This project didn't start off so well. 
We were in Fabricland humming and hawing over how much fabric to buy.
Eric said the car was 3 metres wide. We bought 6 metres of fabric. of both the flannel and the twill. 
Our car actually measures at 1.54 metres. 
Needless to say, there might be some Christmas gifts to this tune. 


The original pinner did a much better job than I did. 
But I wanted to keep it simple. 
This was one of those Measure a QUAZILLION TIMES.
Only cut once! 

I was worried I cut too small considering seam allowances.
Thank goodness this wasn't the case! 

I ended up cutting a square. Just the right width of the fabric for the length and width of my car. 
I top stitched the whole thing! 

My one feedback is that though I did put the snaps like the tutorial suggested, next time I'll just do tie straps. I think that would be just as easy. Plus, snaps cost like $5! Which isn't too bad :P 


DIY Puppy Pee Pads

I believe that it's inevitable that this winter will result in many "puppy accidents" inside.
Daisy has already made it clear she hates the cold winter, and that she cannot hold her bladder for the duration of the night. 

The hormones have helped. There have been significantly fewer accidents. 
A puppy pad has been placed out and she has taken to it. 

But, the downside is that I HATE PUPPY PADS. 
I bought the eco friendy ones. They SUCK.
I don't want to buy them, or throw them out.
Like femine hygiene bads and diapers, they probably don't decompose in the landfill very well. 

So! I've decided to make my own! 


There aren't many tutorials. So I kinda winged it.
I used what I know about making my feminine hygiene pads to make them. 
Because it uses PUL fabric it was slightly expensive. 

Materials:
Diaper Flannel (twice as much)
Flannel. (I found cute puppy dog fabrics)
PUL Fabric (waterproof stuff)
Thread. 

I bought 1.4 metres of flannel and pul and made 6 training pads! 


I choose dimensions that were half the width of the fabric, and then into thirds. Turned out to be 19inches by 22 inches. This was super rough. And I trimmed a lot more down. 


Then the pattern fabric was fused to two layers of diaper flannel. 
when I say fused. i mean I stitched lopsided squares into it. I didn't really make a lot of effort to be super precise. I figured it was just a pee pad. 

Then with right sides together, I matched the flannels with the pul fabric. 
After trimming up some edges they were stitched together


That's right, turn it inside out, and iron! 


I like to leave a gap in the middle of one side (instead of a corner. 
I iron it all together and then do a top stitch around the whole thing. 


Final Product.

Put it down in the puppy pee area (this area needs to be changed)


So far,  nobody has used them. 
Then again nobody has gone inside.
I hope to find some of that puppy urine spray, or wait for an accident to happen and rub it all over it so they know that this is where to go.

Hubby is worried that they'll want to take naps on it. 


Thursday, 11 October 2012

What's Ahead

Two things.

1.  NEW SEWING PROJECTS

A. Dog jackets for the winter! We picked up the fabric today, I cant wait! 

Darn things have been leaving foot prints all over the cushions. So, I'm going to tackle this pinterest project. 


2. weight gain. deserves no capitals.
For my wedding, I attempted to loose weight to look my best and feel best on my special day.
Partly because my mom pointed out how I had gained a lot of weight during college, and then I felt all self conscious and aware. Last summer 2011, I weighed in at 230 pounds. My heaviest yet. 

Today, I finally broke down. I knew it had to happened. While I might have lost 20 pounds for my wedding, my favorite jeans didn't button up yesterday, and at that moment I knew there was a second reason why I had retreated to dresses and leggings.... 222 pounds tonight. 

So game plan. 

a) I need to find something to motivate myself. 

b) I need to cut the crap. 

c) I need to document my intake of food (time to buy a food journal! --- yay shopping) 

d) I need to exercise.
This will include several steps ----- i.i start walking the dogs more often, i.ii. set up the xbox so I can use it to exercise via the kinnect, i.iii seriously consider a gym membership at the university. 

ShareThis

Related Posts Plugin for WordPress, Blogger...